Monday, April 29, 2013

Big City of Word Skyscrapers


Spelling words, spelling words, oh how we're growing tired of spelling words. If you've been a faithful follower this month, you might have noticed a pattern - spelling word activities every Monday. (I think it's safe to say we're in a rut.) So, without further adieu, I give you the last spelling activity you'll see here for awhile.

Some spelling activities are best for review, after a fair amount of practice. This activity, like Spelling Race and Roll &Write, is perfect for that early practice when a child is just beginning to memorize the correct spelling of a handful of words.

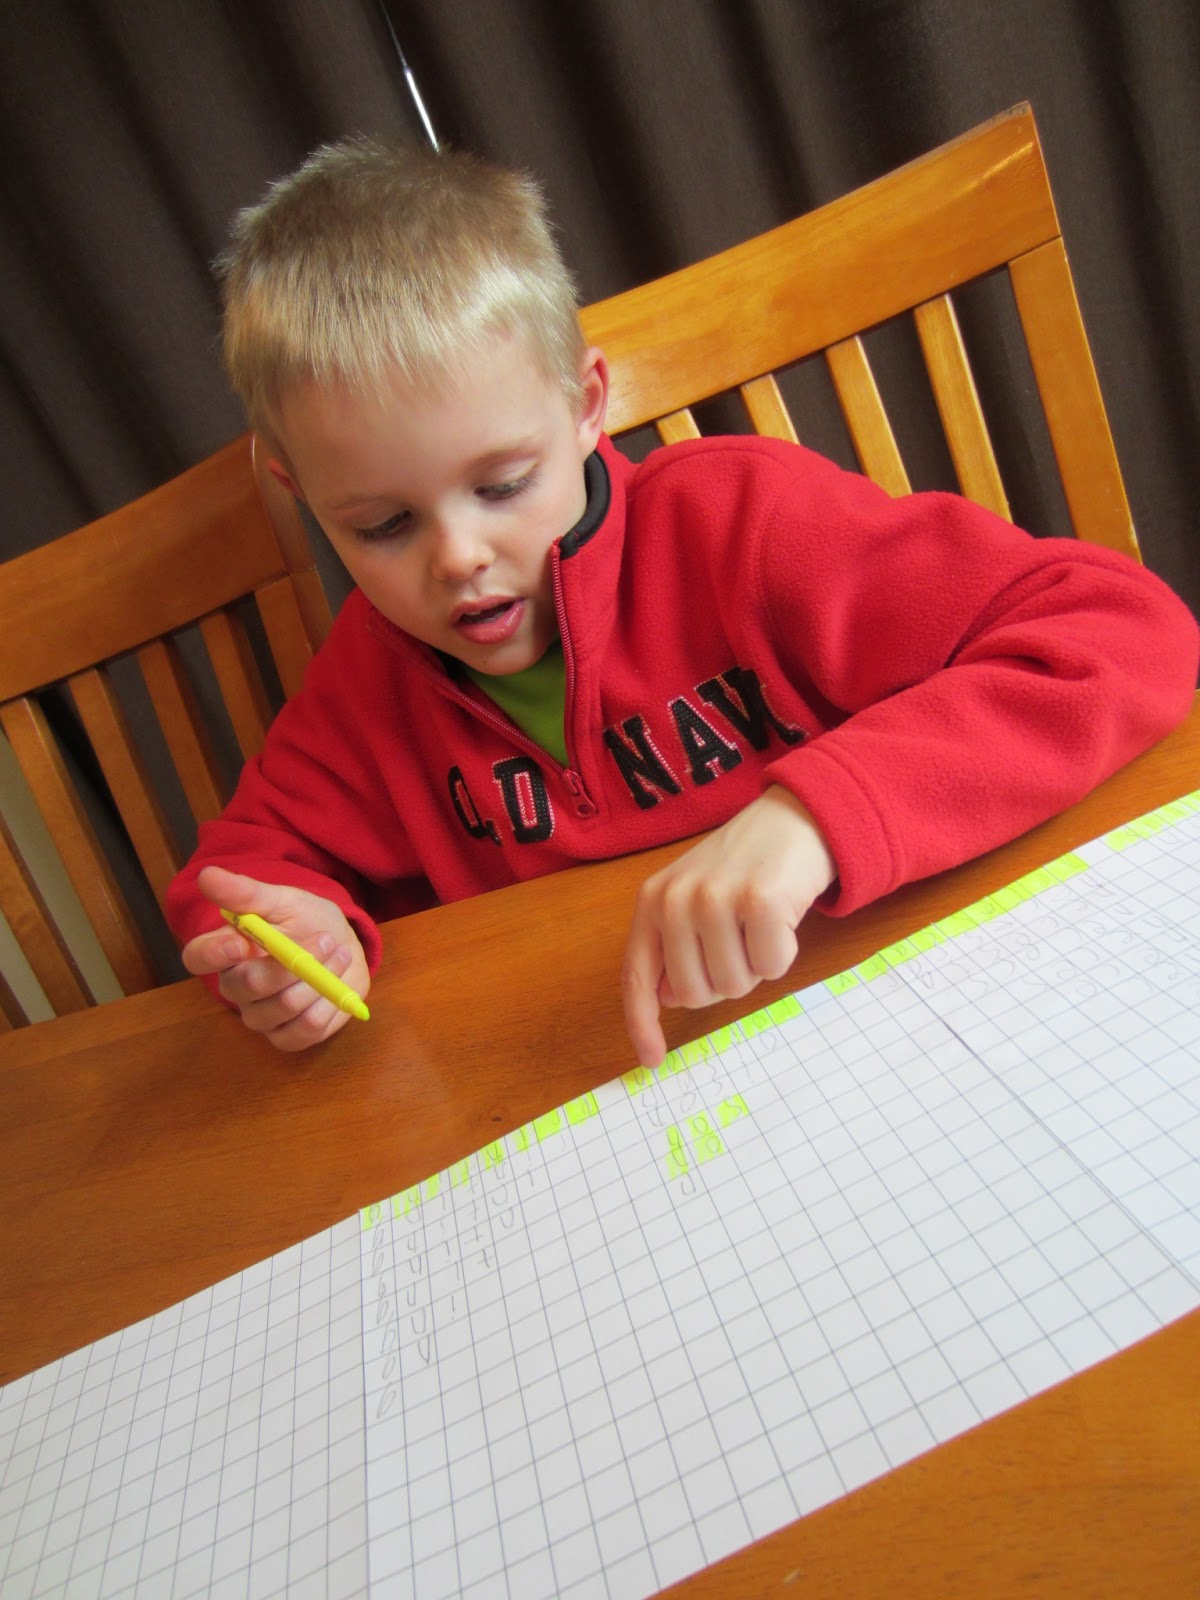
The supply list is short: graph paper, pencil, and a yellow highlighter.

Make a Word Skyscraper
Along the bottom of the page, my son wrote the spelling words, one letter in each box. He spaced the words with one empty box between each.


Then he repeated the words, omitting one letter (either the first or last) on each line, making a stair-stepped skyscraper building for each word from the bottom up. The top of the skyscraper had just one letter (either the first or last).

Here's one of his skyscrapers:
i
in
inv
inve
inven
invent
inventi
inventio
invention
inventions

(The repetition of writing the letters again and again really helps my son with memorization.)

Who's Home in the Word Skyscraper?
Once each word skyscraper was complete, I had my son look at each line of letters (or each story in the skyscraper). Were there any other real words revealed?

In the example above, there were five: I, in, invent, invention, and inventions.


He colored those boxes with the yellow highlighter, simulating lights. (Everyone that lives on the ground floor is always home.)

Tell Me About Your City
With his city of words complete, I asked him several questions.
  • Which skyscraper is the tallest?
  • Which skyscraper has the most people home?
  • Which skyscraper has the fewest people at home?


Repetition works. And spelling practice can be fun.

Thursday, April 25, 2013

DIY Kaleidoscope


Did you have one of those cardboard tube kaleidoscopes as a kid? I did. And I still remember how magical it was to turn it and see the patterned colors change before my very eyes. As an adult I've ogled those fine art kaleidoscopes made of glass and mirrors a few too many times to count.

So when I was thumbing through 50 Science Things to Make & Do by Georgina Andrews and Kate Knighton, the kaleidoscope craft immediately caught my eye.

Could it truly be done? Was it really that simple?

The answer to both questions is yes. And, boy oh boy, is this cool.

Here are the supplies you'll need:
  • 4- by 6-inch piece of chipboard (recycle a cereal box)
  • 4- by 6-inch piece of flat, clear plastic (if you don't have something in your recycle bin that will work, buy an acetate sheet from your local copy shop or a clear report cover from an office supply store)
  • aluminum foil
  • glue stick
  • tracing paper
  • markers
  • tape

Step 1
Fold your piece of cardboard in half so the short edges meet. Then unfold, and fold each of the ends in to the center fold, so that your chipboard rectangle has three heavy creases.


Step 2
Put the piece of clear plastic over the top of your chipboard. Now use a ruler and scissors to score the plastic where the folds are on your chipboard.


Step 3
Set the plastic aside for now. Put glue all over the chipboard and top with aluminum foil (shiny side up). Trim the excess.


Step 4
Lay the scored plastic over the foiled chipboard and fold into a triangular shape (one side with overlap). The foil and plastic should be inside the triangular tube. Tape to close.


Step 5
Cut a small square of tracing paper that's bigger than the triangular opening of your tube (ours was about 3- by 3-inches). Using markers, add a colorful pattern to the paper, filling most of the space with bright colors. The pattern will work best if it radiates out from the center.


Step 6
Now hold the triangular tube up to the light, put it to your eye, and look through it; place the tracing paper pattern over the open end and turn it. Light will shine through the tracing paper and the pattern will be reflected off the sides of the plastic-covered foil, creating a magical transformation of colored shapes.


ENJOY!! (We did.)

Want to try other great ideas like this one? Get the book 50 Science Things to Make & Do!


Monday, April 22, 2013

3 Simple Spelling Review Activities


Is it the end of the school year yet? Oy! Those spelling lists just keep on comin' home with my son.

If you're like me, you'll do anything to find a creative way to make practicing them fun. (Sadly, there is always grumbling from my son when I pull out the list to review.)

Here are some new ideas he's enjoyed recently.

No. 1: Spelling Review Ball Toss
My son is a kinesthetic learner. It's like his brain gets moving when his body is moving too. One day I picked up his Nerf football and we practiced the words one by one, tossing the ball back and forth. I'd say a letter and he'd come up with the next one, with the ball whizzing between us. 

If the ball dropped, we started the word again. If his spelling was incorrect, I explained the error and we began again. We can't continue on to the next word until each one is spelled right.

VARIATION: Take your spelling practice outside. Grab a basketball. Read the words on the list and as your child recites the spelling, have them dribble the ball (one bounce per letter).


No. 2: Invisible Ink Spelling Review
Okay, so I'm exaggerating a little with that title. But seriously, crayon resist makes it easy for kids to self-check their spelling practice. Simply grab a piece of paper and fold it in half the long way. If it's not lined, make lines. Using a white crayon (or I use a fine-tip Crayola twistables colored pencil), write the correct spelling of each word on the right side of the fold. The child spells each word on the left and then gets to use watercolor paint to reveal the "invisible word" on the right. Maybe my son is naive, but he thinks this is nothing short of magic.


No. 3: A-MAZE-ing Spelling
I can't take credit for this idea, although I'd like to. It's genius. Alissa at Creative With Kids shared this idea back in 2011. You can actually turn your child's spelling words into mazes. It takes a little front-end prep (you need to sign up for a free account at Fontstruct and download the Mazey font; also free), but once your computer is equipped with the new font, it's just a matter of typing the spelling words and hitting print.

NOTE: Because my son had the words groan and grown on his list the first week that we did this, I added a sentence above each of the word's mazes to help him understand the difference in the word's use and meaning.


My son had LOADS of fun with this! Once he'd wound his way through the maze, he colored the letters in the maze so it was easier to read the word.

Thursday, April 18, 2013

Multiplication BINGO


This is the fourth BINGO game I've made for my son and I can honestly say that the shine hasn't worn off. My boy still loves BINGO and I still love how easy it is for him to learn amazing things by playing it.

When my son's classroom teacher told me he was ready for multiplication and division at the last parent-teacher conference, I took it as my green light to start really challenging him to learn the math facts.

I made six BINGO cards with the answers to a variety of multiplication problems. (Download the game I made here free). I printed them and the problems on card stock, grabbed a multiplication table (in case my son got stuck), and a bowl of cheerios to use as game pieces. We were ready … almost.

When my son got home, we read a great book of multiplication math problems cleverly disguised as children's fiction. My son had loads of fun with Suzanne Slade's book Multiply on the Fly. We whizzed through the book with my son firing off answers to the insect-inspired queries as quickly as the buzzing bugs on the pages within.

Then we got busy playing.

I turned over all the calling cards so the problems were face down and one by one drew them. I was careful to cover the answer with my thumb as I showed him the problems.


If the answer was on our game cards, we placed a cheerio over it.

We got through quite a few problems, and my son only needed to reference the multiplication table once (8 x 8), before he got a diagonal 5-in-a-row and hollered exuberantly, "BINGO!!!!"


He might have won the game, but having made practicing multiplication a riot for my son made ME feel like a winner too.

I love that.

Monday, April 15, 2013

Shapes, Letters, & Towers: Building with Marshmallows


You know what I love even more than when an activity goes exactly as planned? When my kids take the lesson even further than I'd dreamed. That sends this deceptively educational mom over the moon!

This simple engineering activity is a perfect example.

I got the idea from a local STEM event eons ago, that provided kids with mostly edible building supplies and asked them to build and evaluate which shapes created the strongest, most stable structure. On the table were gumdrops, marshmallows, toothpicks, and uncooked spaghetti noodles.

For our experiment, I omitted the gumdrops. Marshmallows would suffice as our "connectors."

I started by asking my oldest son to build a cube with toothpicks and marshmallows. What he soon discovered was that it was wobbly, wonky, leaning, and shaky (choose whichever adjective you like best).

To stabilize it, he added diagonal lengths of broken spaghetti noodles (essentially X shapes around all the sides). We checked the cube; no more wobbling! He was excited. Now the pace of building REALLY picked up.


While he was busy popping marshmallows in his mouth and building his four-story tower, little brother came wandering by.

"I want to do that," said my preschooler. "I want to make a triangle."

This was when the questions came spilling out of my mouth. "How many sides does a triangle have? How many toothpicks will we need?" In no time flat, he was exercising his fine motor skills to make a triangle.


"I want to make an E," he said next. This took a little more instruction from me but boy, oh boy, was he proud when we were done.


What started as an engineering activity for my oldest son became that AND a lesson in shape and letter recognition for my youngest son. That made the nominal amount I spent on supplies for this activity WELL worth it!

Thursday, April 11, 2013

Wheel of Fortune-Inspired Spelling Game


Each week, we start practicing the spelling list by simply reciting the letters in each word. If my son gets the words wrong (usually five or six out of 12-15 words), I circle them and those are the ones we focus our afterschool study on.

This week our spelling practice was inspired by the game show Wheel of Fortune. I call it Word Reveal.

My son had fun with this activity (and, honestly, I kind of got a kick out of playing Vanna White).

What You Need
3-page Word Reveal PDF (download it here)
3 sheets of legal-sized paper to print on
Laminate
Fine-tip dry-erase marker
Spelling words (up to six)
Page Marker Post-It notes
 
Either of these sizes of Post-Its work with the game board.
Prep
With the "Word Reveal" PDF printed on legal paper and laminated, grab the spelling list. Write the spelling words (one word per each line of boxes and one letter in each box) with the dry-erase marker. Over the top of each letter, place a Post-It Note Page Marker (there are some guide lines to help you position the notes). Make sure you can't see the letter through the note (i.e. don't use the yellow Post-Its!).


NOTE: You can trim the three pages once laminated, use packing tape to form hinges, and make it into a tri-fold game board for easy storage.

It's helpful to write down the words your child is practicing to refer to.

Play
Invite your child to guess letters. You can either uncover every "a" (as an example) on the Word Reveal board, or just the "a"s that are in one word at a time (it's your choice).


As more and more letters are uncovered, encourage your child to try and guess which of their spelling words are on the game board. If they guess right, have them spell the word, peeling back the Post-Its as they recite each letter to make sure their spelling is accurate.


Once practice is done, reward your child for their hard work with a hug, high-five, or special treat!

Monday, April 8, 2013

Could that BEE a Synonym or Antonym?


This game is a prelude to what will (hopefully) become some better writing on my boy's part. His stories are simple sentences with unimaginative adjectives, nouns, and verbs.

I wanted to open his mind to a wider, broader vocabulary. I thought a little synonyms and antonyms game might help.

I made two pages of hexagon magnets, each shape containing three words. Their antonyms and synonyms were featured on adjacent hexagons.

I printed the pages on magnet paper, tediously cut them out, and then hit the library for some great books.

Are you rolling your eyes? I know. I know. You're probably tired of hearing me gush all over Brian P. Cleary's books. I can't help it if they're the most fun language arts explanations I've found; my son loves them as much as I do. 


For this lesson, we read Stop and Go, Yes and No: What is an Antonym? and Stroll and Walk, Babble and Talk: More about Synonyms. Wildly creative illustrations, a rhythmic tempo, great explanation of the parts of speech, and examples galore! If you've never opened one of the Words are CATegorical books, run to your local library and check one out now.

Prep
Download our synonym/antonym hexagons free. Print on magnet paper (it costs about $6 for a 3-pack of sheets at the craft store; feed it through your printer one page at a time). Cut out.


Access a 2-page PDF of synonym/antonym hexagons here.

Play
I put all the magnets word-side-down in a small flat tub. One was drawn and placed on our refrigerator (any large metal surface will work). Then each of us picked five hexagons as our "hand." (It doesn't matter if the opponent sees your magnets.) Then we went back and forth trying to add the magnets in our hand to the refrigerator, matching up synonyms or antonyms on the words on the shapes. It doesn't take long before a honeycomb shape emerges!


If we didn't have any magnets to play, we drew a new one from the bucket. Still can't play? Then you forfeit your turn and the opponent gives it a shot.

Every time you are able to add a hexagon magnet to the refrigerator, you get another turn to play any magnet from your hand (no drawing on the second - or subsequent - plays during a turn, though).


Watch as you build an entire honeycomb of antonyms and synonyms!

The first player to play all of the hexagons in their hand wins.

Repetition to Remember Synonym vs. Antonym
With each hexagon that was played, my son and I said aloud whether the words we were matching were synonyms (words with a similar meaning) or antonyms (opposites). This reinforced what we learned from reading Cleary's books!

Thursday, April 4, 2013

There, Their, or They're: You Be the Judge


My son got off the bus last week with a long face. He'd failed the pre-test and came home with the easy list of spelling words. I was surprised; he's good at spelling. As soon as he handed me the list, I understood.

There. Their. And they're. That's what had happened.

Not only had his teacher expected him to spell them right, but he needed to know when to use which one in a sentence. My son had totally botched it up.

Those three words sound EXACTLY the same but are used COMPLETELY differently. How confusing!!

To help him study, I gave him a little lesson with some tips and tricks.

There
Within this word is another word: here. There usually represents a place.
Very often, if you can substitute here in place of there, you've used it correctly.

Their
This is a possessive pronoun. I reminded my son that "I" was also a pronoun, which was a hint to help him remember that this their is the only one spelled with an i.
If you can replace their with our and the sentence still makes sense, you've used it correctly.

They're
Among these three words (there, their, and they're), this is the only one that is a contraction. It's an abbreviation for they are.
If you can put they are in place of they're, you used the right word.

Now it was time to put his knowledge to the test.

Download a 1-page PDF of this worksheet here.

"You be the judge," I said. "Read the sentences on the post-it notes and decide if the correct there, their, or they're was used."


I reminded him that the scale on my DIY worksheet needed to be balanced, so an equal number of sentences should be on the incorrect side as the correct side.

This took LOADS of thought and he referenced the cheat sheet of hints I made several times. I was so proud when he caught two misplaced sentences moments before handing me the worksheet to check. He'd sorted all the sentences correctly!


I gave him eight sentences to sort. Here they are, along with some extras we'll be using for future practice:

Correct:
I put my shoes right there.
It was their team's turn to answer.
They're my favorite band!
There is the book I lost.
Their car is blue, not grey.
I asked, but they're out of town that day.
Let's go there.
Their house is the one with the picket fence.
They're too short to ride the roller coaster.

Incorrect:
Their are no cookies left!    <<should be there>>
There excited for the party.   <<should be They're>>
Why didn't they listen to they're teacher?   <<should be their>>
Are we almost they're?  <<should be there>>
Their daydreaming, instead of listening. <<should be they're>>
There project was the winner. <<should be Their>>
My favorite pizza place is right their.  <<should be there>>
I can't see them; there too many people here.  <<should be they're>>
Lots of people are stopping at there lemonade stand. <<should be their>>

Monday, April 1, 2013

Fun with a Funnel Phone


If you're talking about how your ear works or how sound travels, this activity is the perfect companion. 

It takes next to no time to assemble once you've made a stop at the local hardware store. To make yourself kids a funnel phone, you need the following:
  • vinyl tubing (ours was 3/4 inch x 5/8 inch x 10 feet, found in the plumbing supply section)
  • 2 plastic funnels, found in the automotive supply section
  • duct tape

Assembly is quick and easy. 

Jam each funnel into the ends of the tubing and secure with a short length of duct tape.


Now hand over the phone to two children and watch them have loads of fun whispering secrets to each other. My boys LOVED this activity and the total cost was only about $9. I knew the phone was a hit with my oldest son when he asked, "Can I keep it, Mom?"

"Of course!" I responded. I'm sure this will get loads of use with his buddies during our next play date, too.


Extension ideas:
  • Work on rhyming. You say a word and ask your child to whisper back a word that rhymes.
  • Practice spelling. They listen for the word. You listen to make sure they spell it right.
  • Math fact drills. Put down the flashcards and whisper addition, subtraction, multiplication, or division problems through the funnel. How quickly can your child whisper back the answer?
  • Foreign language vocabulary practice. If you're teaching your child another language, see if you can practice words or sentences with the funnel phone.

I got this ingenious idea here.